Dimraeth Best Gear Sets and Tier Bonuses: End-Game Build Guide (2026)
If there is one thing I have learned from spending too much time with isometric action RPGs, it is that end-game gear is where a perfectly decent character can suddenly become either a monster or a walking loot piñata.
Dimraeth takes that idea seriously. Leveling gives you the foundation, but your equipment is what ultimately decides how your character actually plays. A good set can change the way a spell behaves, turn a defensive ability into an offensive tool, or completely reshape the rhythm of a combat rotation.
That is why I would not treat Dimraeth gear as something you simply replace whenever a bigger number appears. The interesting part is figuring out which pieces belong together and which bonuses actually support your build.
This guide covers the Dimraeth gear tiers, all eight equipment slots, named set bonuses, Tier III/Tier V/Tier VI unlocks, and the end-game stats I would prioritize when building around a specific archetype.

How Dimraeth Gear Progression Actually Works
The equipment system is built around eight gear slots, each with its own purpose:
| Slot | Main Purpose |
|---|---|
| Amulet | Elemental resistance and core stat amplification |
| Badge | Skill behavior and class-resource scaling |
| Belt | Inventory, utility, and stamina-related bonuses |
| Bracer | Defense, casting speed, and attack velocity |
| Charm | Secondary attributes and survival effects |
| Ring | Critical strike chance and critical multipliers |
| Rune | Physical, Fire, Ice, Blunt, or Poison damage scaling |
| Undercoat | Elemental mitigation, stamina efficiency, and physical armor |
What makes this system especially important is that every slot follows a six-tier progression, from Tier I all the way to Tier VI.
The difference between early and end-game equipment is not simply cosmetic. Higher tiers increase baseline attributes and improve the potential quality of random rolls.
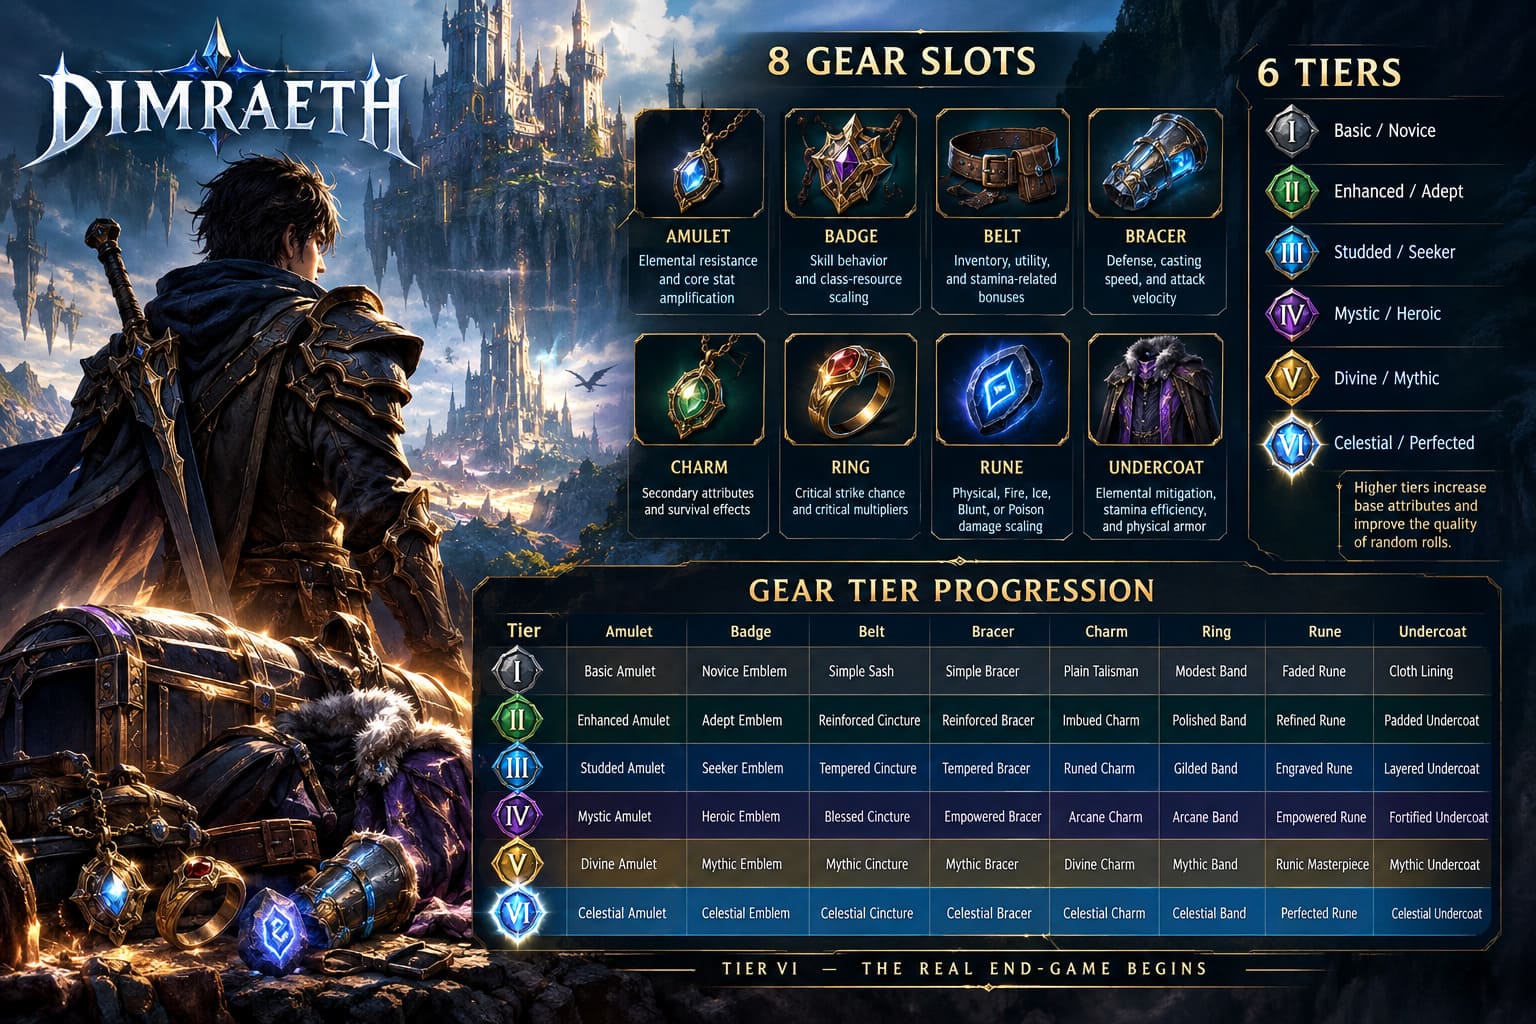
Dimraeth Gear Tier List
| Tier | Gear Quality | Progression Role |
|---|---|---|
| Tier I | Basic / Novice | Early-game equipment |
| Tier II | Enhanced / Adept | Mid-game progression |
| Tier III | Studded / Seeker | Early set-bonus territory |
| Tier IV | Mystic / Heroic | High-end progression |
| Tier V | Divine / Mythic | Late-game elite equipment |
| Tier VI | Celestial / Perfected | Ultimate end-game gear |
The actual item progression is very specific.
Tier I: Basic Amulet, Novice Emblem, Simple Sash, Simple Bracer, Plain Talisman, Modest Band, Faded Rune, Cloth Lining.
Tier II: Enhanced Amulet, Adept Emblem, Reinforced Cincture, Reinforced Bracer, Imbued Charm, Polished Band, Refined Rune, Padded Undercoat.
Tier III: Studded Amulet, Seeker Emblem, Tempered Cincture, Tempered Bracer, Runed Charm, Gilded Band, Engraved Rune, Layered Undercoat.
Tier IV: Mystic Amulet, Heroic Emblem, Blessed Cincture, Empowered Bracer, Arcane Charm, Arcane Band, Empowered Rune, Fortified Undercoat.
Tier V: Divine Amulet, Mythic Emblem, Mythic Cincture, Mythic Bracer, Divine Charm, Mythic Band, Runic Masterpiece, Mythic Undercoat.
Tier VI: Celestial Amulet, Celestial Emblem, Celestial Cincture, Celestial Bracer, Celestial Charm, Celestial Band, Perfected Rune, Celestial Undercoat.
And honestly, Tier VI is where the gear chase starts feeling serious. These are not just slightly better versions of the same equipment. This is where the strongest end-game combinations come together.
The Best Dimraeth Named Gear Sets
The named sets are where things get much more interesting. Their bonuses unlock at Tier III, Tier V, or Tier VI, depending on the set.
Some are extremely specialized. Others are flexible enough to become staples for entire archetypes.
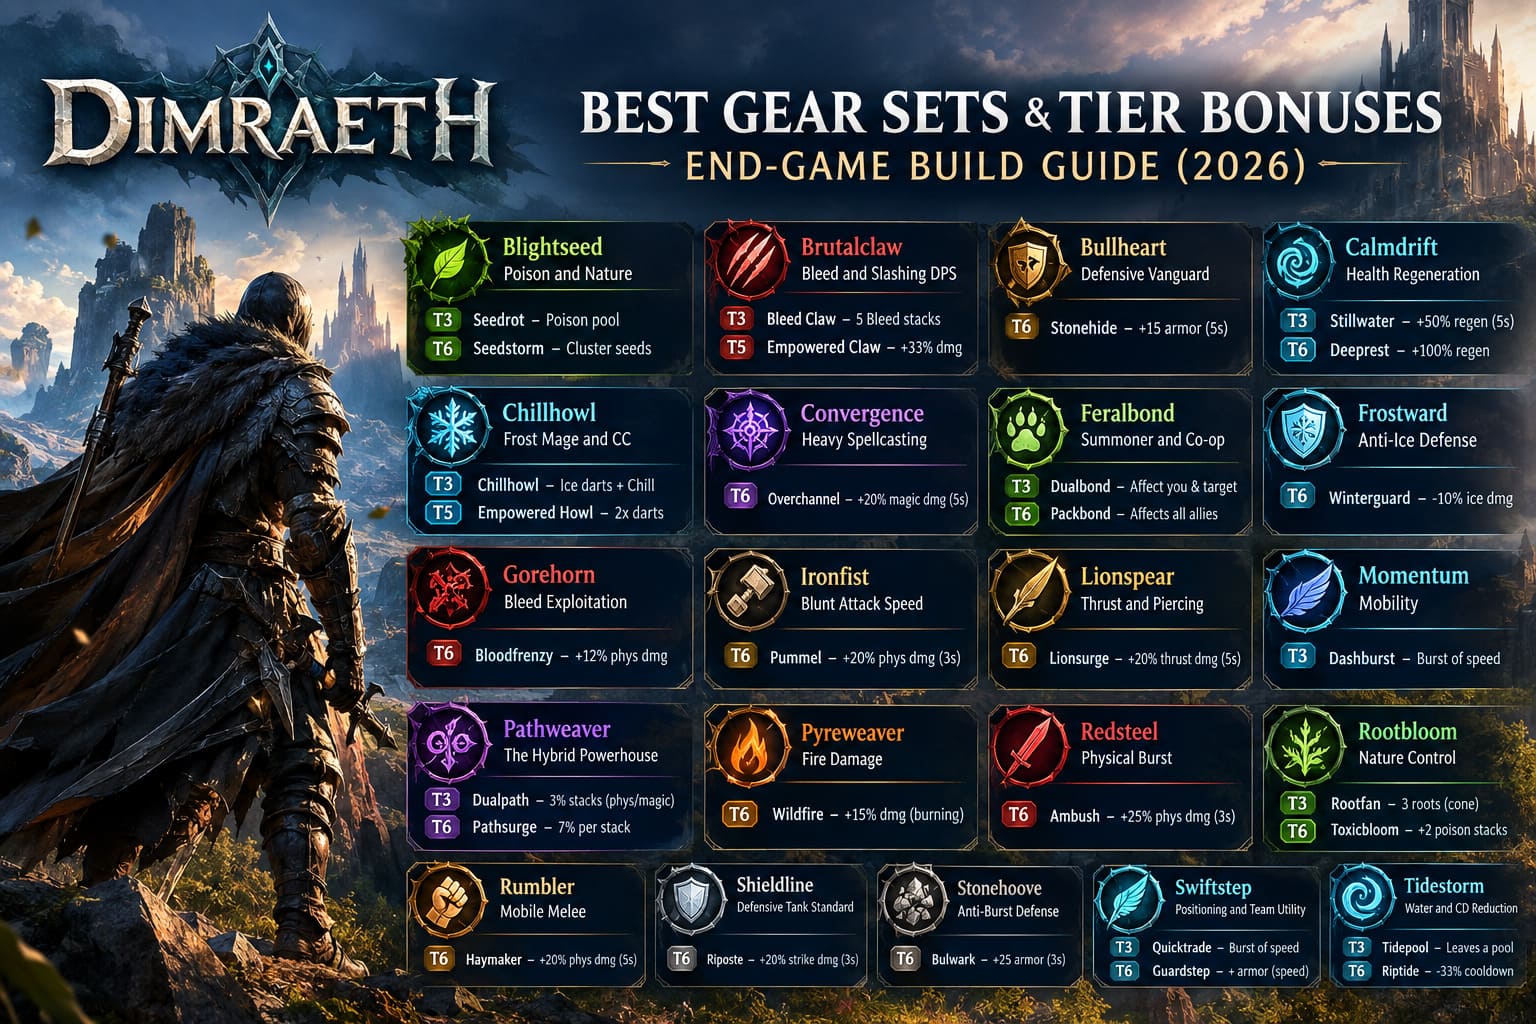
Blightseed — Poison and Nature
T3 — Seedrot: Seed bombs leave a poison pool when they explode.
T6 — Seedstorm: Throw a cluster of seeds instead of one.
Blightseed is one of my favorite examples of a set actually changing how an ability feels. At T3, your seed bombs become area denial tools. At T6, the ability turns into a much more aggressive room-clearing attack.
For Poison and Nature builds, this is an obvious choice.
Brutalclaw — Bleed and Slashing DPS
T3 — Bleed Claw: Savage Claw applies 5 Bleed stacks.
T5 — Empowered Claw: Savage Claw deals 33% extra damage.
Brutalclaw is built around aggressive physical pressure. The early Bleed stacking is already useful, but the additional 33% damage at T5 makes it particularly attractive for fast melee skirmishers.
Bullheart — Defensive Vanguard
T6 — Stonehide: Hitting an enemy with Blunt Damage grants 15 armor for 5 seconds.
This is a very straightforward tanking set, and I mean that as a compliment. If your character spends most of the fight swinging a hammer or mace into groups of enemies, Bullheart turns that aggression into additional protection.
Calmdrift — Health Regeneration
T3 — Stillwater: After taking damage, Health Regen increases by 50% for 5 seconds.
T6 — Deeprest: Increases the Health Regen of this effect to 100%.
Calmdrift is the set I would look at when survival is more important than flashy damage numbers. It gives you an automatic recovery mechanism after taking damage, making it particularly useful for solo players.
Chillhowl — Frost Mage and Crowd Control
T3 — Chillhowl: Howl fires seeking ice darts at nearby enemies, dealing Ice Damage and applying 2 Chill stacks.
T5 — Empowered Howl: Doubles the number of darts.
This one is nasty in the best possible way.
A defensive utility skill becomes a homing Ice projectile attack while also applying Chill. At T5, doubling the darts makes the effect even more useful against groups.
For Frost Mage and crowd-control builds, Chillhowl is one of the sets I would put near the top of the list.
Convergence — Heavy Spellcasting
T6 — Overchannel: Spending more than 30 Concentration at once grants +20% Magic Damage for 5 seconds.
Convergence is designed for players who actually manage their resources instead of throwing spells the instant they become available.
The idea is simple: save enough Concentration, spend more than 30 at once, then exploit the five-second Magic Damage window.
Feralbond — Summoner and Co-op
T3 — Dualbond: Power of the Wild affects both you and your target.
T6 — Packbond: Power of the Wild affects all allies around you.
Feralbond gets dramatically better in group content.
At T3 it is already useful, but T6 turns the ability into a party-wide aura. In an 8-player cooperative raid, this can provide enormous value by improving the physical damage output of the entire group.
Frostward — Anti-Ice Defense
T6 — Winterguard: Chilled enemies deal 10% less damage to you.
This is a niche set, but that does not make it weak. Against frost-focused enemies or in glacial environments, Frostward can become a very sensible defensive choice.
Gorehorn — Bleed Exploitation
T6 — Bloodfrenzy: Bleeding enemies take 12% increased Physical Damage from you.
The intended rotation is obvious: apply Bleed first, then hit the target with your biggest physical attacks.
If your build already revolves around Bleed, Gorehorn fits naturally into the damage loop.
Ironfist — Blunt Attack Speed
T6 — Pummel: Rapid Blunt Damage hits against the same enemy increase Physical Damage by 20% for 3 seconds.
Ironfist rewards staying close and maintaining pressure. Rapid-fist and dual-mace builds are the obvious candidates.
Lionspear — Thrust and Piercing
T6 — Lionsurge: Critical Thrust Damage grants +20% Thrust Damage for 5 seconds.
This is where Rings and Badges become particularly important. Increasing critical strike chance helps maintain the buff, making Lionspear attractive for spear, rapier, and ranged bow setups.
Momentum — Mobility
T3 — Dashburst: Dashing grants a burst of Movement Speed.
Momentum is one of those sets that looks simple on paper but can be extremely useful in actual combat. Ranged kiting builds and mobile dual-dagger characters should get plenty of value from it.
Pathweaver — The Hybrid Powerhouse
T3 — Dualpath: Physical Damage grants 3% stacking Magic Damage for 4 seconds. Magic Damage grants 3% stacking Physical Damage for 4 seconds. Each effect stacks up to 5 times.
T6 — Pathsurge: Increases both effects to 7% per stack.
Pathweaver is probably the set I find most interesting mechanically.
It rewards players who alternate between physical and magical attacks rather than relying on one damage type. At T6, five stacks can produce a 35% bonus to each damage type.
For a true spellsword or hybrid build, that is an enormous payoff.
Pyreweaver — Fire Damage
T6 — Wildfire: Burning enemies take 15% increased damage from you.
Pyreweaver does not overcomplicate things. Keep enemies Burning and hit them harder.
For pure Fire spellcasters, that straightforward approach is exactly what makes the set attractive.
Redsteel — Physical Burst
T6 — Ambush: After Dashing, your next attack within 3 seconds deals 25% increased Physical Damage.
Redsteel is built for hit-and-run combat. Dash through an enemy’s attack pattern, reposition, and immediately follow with a heavy physical strike.
Rootbloom — Nature Control
T3 — Rootfan: Entangling Roots summons 3 roots in a cone.
T6 — Toxicbloom: Roots apply 2 additional Poison stacks.
Rootbloom expands crowd control from a single-target effect into a much broader cone. The added Poison stacks make it even more useful for Nature and control-oriented builds.
Rumbler — Mobile Melee
T6 — Haymaker: After Dashing, gain +20% Physical Damage for 5 seconds.
Rumbler has a similar philosophy to Redsteel, but the reward lasts longer. Instead of boosting one attack, it creates a five-second damage window.
That makes it better suited to sustained melee pressure.
Shieldline — Defensive Tank Standard
T6 — Riposte: Blocking an attack grants +20% Strike Damage for 3 seconds.
This is exactly the sort of mechanic I want to see on a tank set. Blocking is not merely passive defense; successful blocks feed directly into your next offensive window.
Stonehoove — Anti-Burst Defense
T6 — Bulwark: Taking more than 30% of your HP in a single hit grants +25 Armor for 3 seconds.
If a boss can chunk your health with one enormous attack, Stonehoove provides a very useful emergency buffer.
It is essentially an insurance policy against brutal end-game mechanics.
Swiftstep — Positioning and Team Utility
T3 — Quicktrade: Swap grants you and your target a burst of Speed.
T6 — Guardstep: You also gain Armor during the Speed boost.
Swiftstep is particularly interesting in cooperative content. It can help reposition an endangered ally while giving both players mobility, with the T6 version adding extra defense.
Tidestorm — Water and Cooldown Reduction
T3 — Tidepool: Water Surge leaves a pool behind.
T6 — Riptide: Reduces Water Surge cooldown by 33%.
Tidestorm combines battlefield control with faster ability rotations. The residual pool creates another area-control element, while the 33% cooldown reduction gives Water Surge considerably more uptime.
Which Dimraeth Gear Sets Should You Build Around?
There is no single universal best set, and I think that is one of the better things about this system.
Your choice should follow your damage type and combat role.
| Build Type | Strong Set Choices | Main Stats to Prioritize |
|---|---|---|
| Poison / Nature | Blightseed, Rootbloom | Status duration, mana regeneration, cooldown reduction |
| Fire Caster | Pyreweaver | Status effects, casting efficiency, cooldown reduction |
| Hybrid Spellsword | Pathweaver | Attack speed, casting speed, critical stats |
| Bleed Physical | Brutalclaw, Gorehorn | Physical damage, Bleed synergy, critical stats |
| Blunt Vanguard | Bullheart, Ironfist | Armor, attack speed, stamina efficiency |
| Shield Tank | Shieldline, Stonehoove | Block, armor, poise, health regeneration |
| Frost Control | Chillhowl, Frostward | Ice damage, Chill effects, defensive stats |
| Mobile Melee | Redsteel, Rumbler, Momentum | Movement, attack speed, physical damage |
| Support / Co-op | Feralbond, Swiftstep | Utility, survivability, resource efficiency |
| Water Control | Tidestorm | Cooldown reduction, Water damage, control effects |
Dimraeth Best Starter Class Guide: Top Builds for Early Access (2026)
My End-Game Stat Priorities
This is where I would be careful about blindly copying somebody else’s build.
A set bonus can be fantastic, but if the rest of your gear does not support it, you are leaving a lot of power on the table.
For Damage-over-Time builds, especially Blightseed and Pyreweaver, I would prioritize status damage duration, mana regeneration speed, and cooldown reduction.
For Pathweaver, the goal is different. Attack speed, casting speed, and critical strike metrics help you move between Physical and Magic damage quickly enough to maintain the stacking effects.
For Vanguard builds, particularly Shieldline, Bullheart, and Stonehoove, defensive stats should take priority. Block values, flat Armor, poise limits, and Health Regeneration all become important.
And there is one thing I would absolutely avoid: building around a Tier VI bonus while neglecting the actual stats on your individual pieces.
A perfect set bonus cannot completely rescue a poorly optimized character.
How to Fix Dimraeth Crashing on Launch, Black Screen, and Startup Freezes
Final Thoughts on Dimraeth End-Game Gear
The best part of the Dimraeth gear system is that the strongest equipment does not simply mean “equip the item with the biggest number.”
The named sets give the end game an actual identity.
Blightseed turns seed bombs into poison zones. Chillhowl turns Howl into an Ice projectile barrage. Pathweaver rewards constantly switching between Physical and Magic attacks. Shieldline makes blocking part of your damage rotation. Feralbond becomes a party-wide support tool at T6.
That is much more interesting than another loot system where every upgrade is just a slightly larger damage value.
If you are still climbing through the tiers, I would focus first on establishing your build identity, then work toward the named set that supports it. Once you reach Tier V and eventually Tier VI, start treating individual rolls and secondary stats as seriously as the set bonus itself.
The long-term goal is not simply to collect Celestial gear.
It is to build a character where every slot, every bonus, and every combat mechanic is pulling in the same direction.
That is when Dimraeth’s end game really starts to click.