Diablo 4 Socket Guide: How to Add Sockets to Jewelry and Weapons (2026)
If there is one Diablo 4 system that looks simple but becomes surprisingly important once you reach the endgame, it is socketing. Early on, putting a random Ruby or Emerald into a piece of gear barely feels like a major decision. Later, when you’re pushing the Pit, fighting Torment bosses, or trying to squeeze the last bit of damage out of a carefully built character, that empty socket suddenly matters a lot.
The good news is that adding sockets in Diablo 4 is not complicated. The slightly annoying part is understanding when to spend your materials, which items are worth socketing, and how many sockets each gear slot can actually have.
This 2026 Diablo 4 socket guide breaks down the whole process, from unlocking the Jeweler to farming Scattered Prisms and deciding which pieces of equipment deserve your resources.
Quick Socketing Overview
| Gear Type | Maximum Sockets | Main Use |
|---|---|---|
| One-Handed Weapon | 1 | Gems or Runes |
| Two-Handed Weapon | 2 | Gems or Runes |
| Ranged Weapon | 2 | Gems or Runes |
| Off-Hand | 1 | Gems or Runes |
| Ring | 1 | Gems |
| Amulet | 1 | Gems |
| Helm | 2 | Gems |
| Chest Armor | 2 | Gems |
| Pants | 2 | Gems |
Gloves and Boots cannot receive sockets.
The important thing to remember is that socket limits are fixed. You cannot keep throwing Scattered Prisms at an item hoping to turn it into a six-socket monster. Once an item reaches its maximum, that’s it.
How to Add a Socket in Diablo 4
The Jeweler is the NPC you want whenever you need to add or manage sockets. Once you’ve unlocked the service, the process itself is refreshingly straightforward.
Head to a major city, find the Jeweler, and choose the option for adding sockets. From there, select the weapon or jewelry piece you want to modify. The game will show the required gold and Scattered Prism cost before you confirm the upgrade.
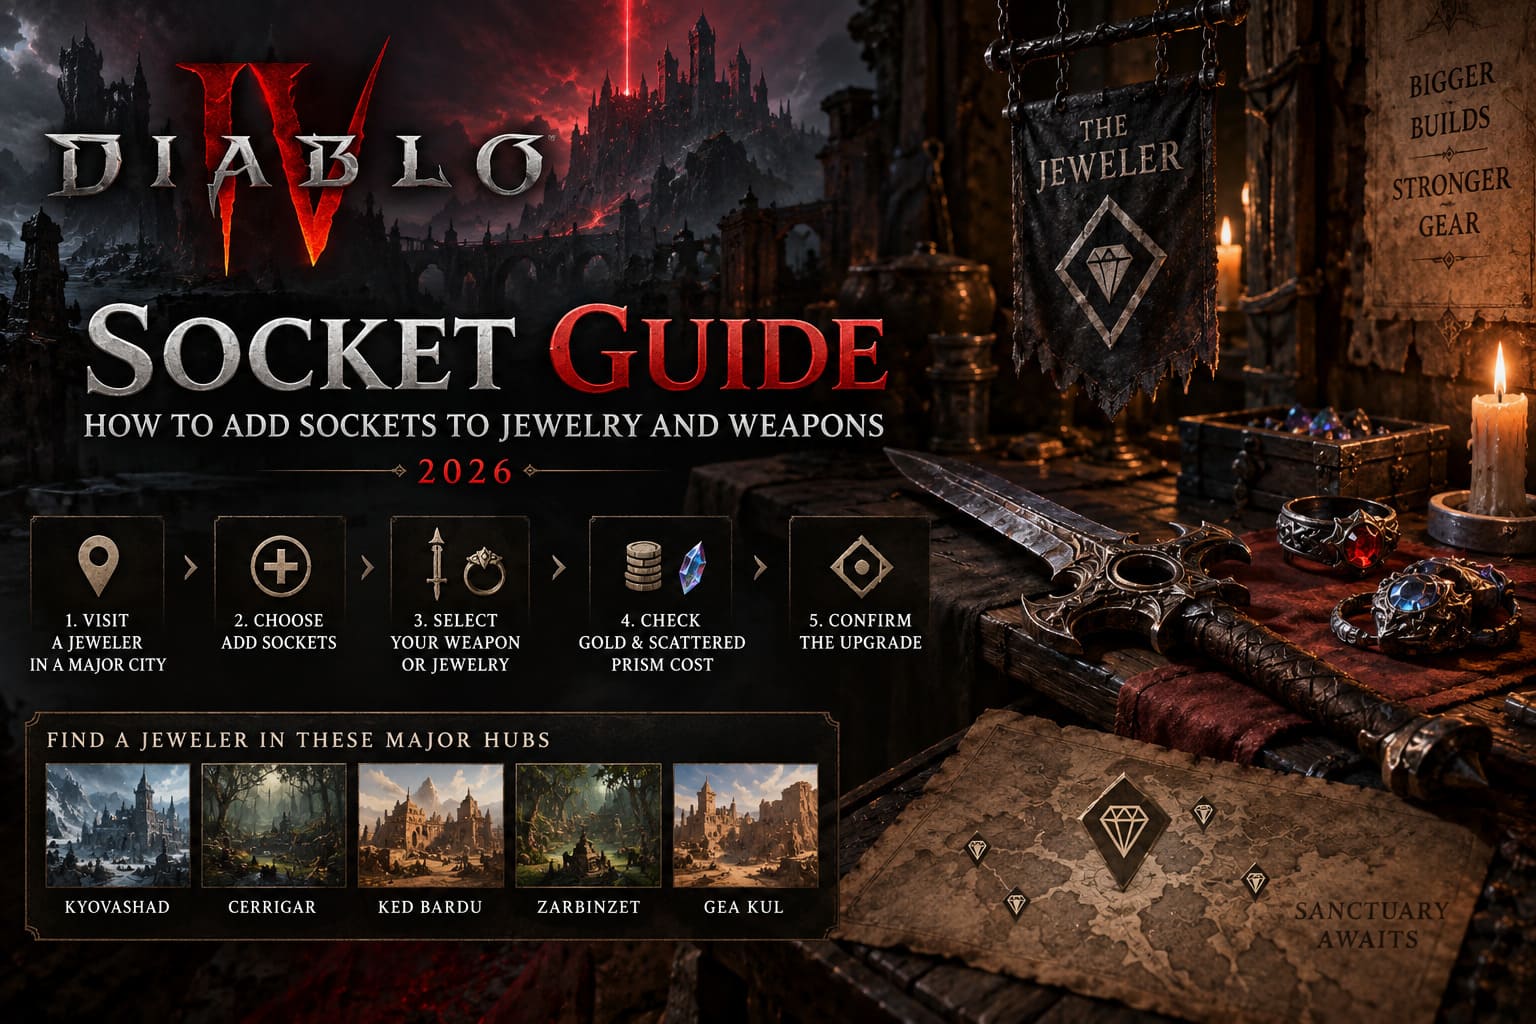
The basic process is:
- Visit a Jeweler in a major city.
- Open the Add Sockets option.
- Select your weapon, ring, or amulet.
- Check the displayed gold and Scattered Prism cost.
- Confirm the upgrade.
- The item returns to your inventory with an empty socket.
There is no random chance involved here. If the item is eligible and you have the required materials, the socket is added successfully.
That’s actually one of the nicer parts of the system. Unlike enchanting or tempering, you’re not gambling with the item itself.
Where Can You Find the Jeweler?
After unlocking the Jeweler, you can use this service in most major hubs around Sanctuary. Common locations include:
- Kyovashad
- Cerrigar
- Ked Bardu
- Zarbinzet
- Gea Kul
Look for the diamond-shaped Jeweler icon on the map.
How to Unlock the Jeweler
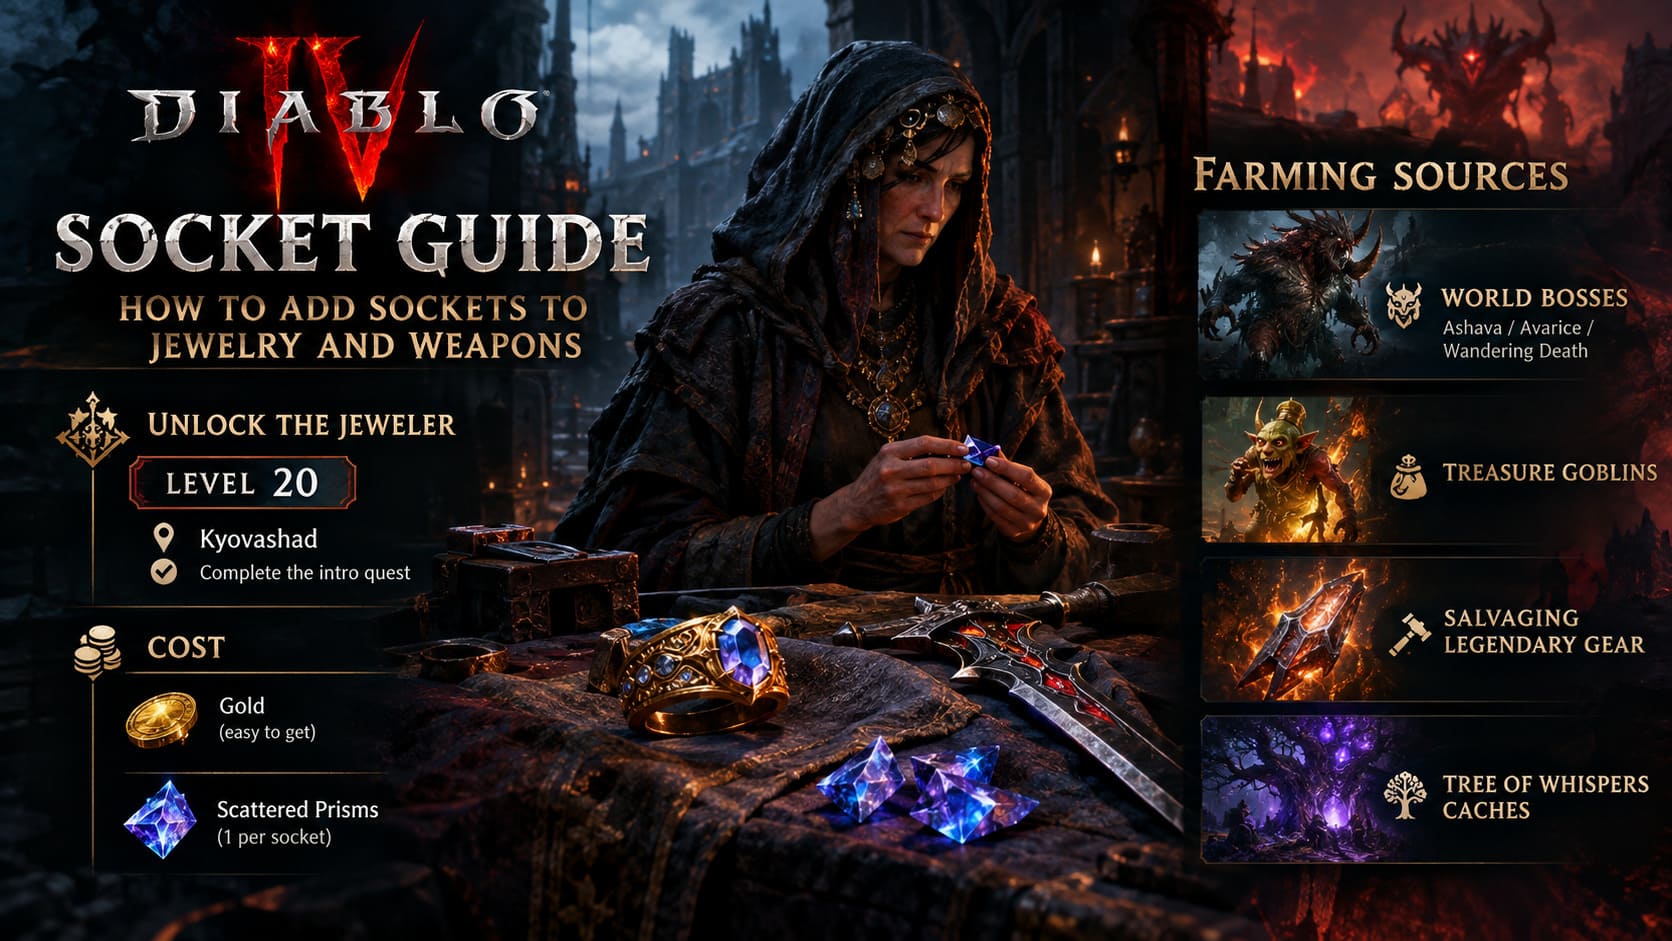
The Jeweler becomes available around Level 20, when the related Priority Quest becomes available. You’ll be directed to the Jeweler in Kyovashad, and after completing the short introduction, the service becomes available across your character’s progression.
If you’re already deep into the game and wondering why you can’t find the socketing option, check whether you’ve completed the introductory Jeweler quest.
It is one of those small progression requirements that’s easy to overlook when you’re rushing through the campaign.
How Much Does Adding a Socket Cost?
The two resources you need to watch are Gold and Scattered Prisms.
Gold is the easy part. You will naturally accumulate a lot of it while playing, although repeated crafting and upgrading can drain your stash faster than you’d expect.
Scattered Prisms are the resource you really need to think about.
You generally need one Scattered Prism for each socket you add. That makes them especially valuable when you’re working on several endgame items at once.
| Resource | Why You Need It | Difficulty |
|---|---|---|
| Gold | Socketing fee | Easy to accumulate |
| Scattered Prism | Required for each added socket | Much more limited |
My biggest recommendation is simple: don’t spend Scattered Prisms on gear you already know you’re going to replace.
There’s nothing worse than finally finding a fantastic weapon and realizing you’ve burned your prism supply putting sockets into three temporary leveling items.
How to Farm Scattered Prisms
Scattered Prisms are one of those materials that tend to disappear exactly when you need them. Fortunately, endgame activities can provide several ways to build up a reserve.
World Bosses
World Bosses are one of the most reliable targets when you’re specifically looking for Scattered Prisms.
Encounters such as Ashava, Avarice, and Wandering Death can reward the material, making World Boss events worth keeping an eye on during your normal endgame routine.
If you’re already doing World Bosses for other rewards, this is basically free additional value.
Treasure Goblins
Treasure Goblins are another useful source.
They’re annoying little creatures, they run away at exactly the wrong moment, and naturally they seem to appear when you’re doing something completely different. Still, catching one can pay off with useful loot and crafting materials, including Scattered Prisms.
Don’t build your entire farming strategy around finding Goblins, but absolutely kill them when you encounter one.
Salvaging Legendary Gear
This is less exciting but fits naturally into normal Diablo 4 gameplay.
When you’re sorting through mountains of Legendary equipment, salvaging unwanted pieces can occasionally return useful crafting materials. Scattered Prisms are not guaranteed from every Legendary, so think of this as a passive source rather than a dedicated farming method.
The more efficiently you filter your inventory, the more useful this becomes over time.
Tree of Whispers Caches
Completing Grim Favors and collecting your reward caches from the Tree of Whispers can also provide Scattered Prisms.
Again, this isn’t necessarily the fastest method if your only goal is socket materials. But if you’re already completing Whispers for experience, gear, or other resources, the additional crafting materials are welcome.
Socket Limits in Diablo 4
This is where a lot of new players waste time.
Different equipment slots have different socket caps, and those limits are hard-coded. Knowing them before spending your materials saves you from unnecessary experimentation.
Weapons
One-handed weapons: maximum 1 socket.
Two-handed weapons: maximum 2 sockets.
Bows and crossbows: maximum 2 sockets.
Off-hand items: maximum 1 socket.
That means a two-handed weapon can potentially require two Scattered Prisms if you are starting with no sockets and want to reach its maximum.
For a build that depends heavily on weapon gems or Runewords, those extra sockets can be a meaningful part of the final setup.
Jewelry
Rings and amulets can each have one socket.
That may sound restrictive, but jewelry sockets are extremely useful because gems can help solve defensive problems that become much more noticeable in higher difficulties.
For example, using the appropriate gems can help you reach the resistances and defensive benchmarks your build needs.
What About Armor?
Armor follows a similar pattern, although not every slot can be socketed.
Helms, Chest Armor, and Pants can have up to two sockets, while Gloves and Boots cannot receive sockets.
That distinction becomes particularly important when you’re planning a full endgame setup.
You shouldn’t look at every empty item slot and assume you can eventually add a socket. Some gear simply isn’t designed to accept one.
Gems or Runes: What Should You Put in Your Sockets?
This depends heavily on your build.
Jewelry is primarily about Gems, while eligible weapon and armor slots can interact with the game’s Rune and Runeword systems.
For traditional gem setups, common choices include:
- Emeralds for offensive bonuses.
- Rubies for builds that benefit from Overpower.
- Diamonds when you need additional resistance.
- Skulls and other gems depending on your desired defensive setup.
There isn’t one universal “best gem” for every Diablo 4 character.
That’s actually one of the more interesting parts of socketing. The right choice depends on whether your character is struggling with damage, survivability, resistances, or specific build requirements.
Don’t blindly copy the gem choice from another build just because the build is popular. Look at what your character is actually missing.
How to Socket and Remove Gems
Once you have an empty socket, inserting a Gem or Rune is simple and doesn’t require another crafting session.
Open your inventory, select the socketable item, and place it into the appropriate empty socket.
If you later decide that you want to change your setup, the Jeweler can also handle unsocketing.
This is particularly useful when you upgrade your gear. You don’t have to throw away a valuable Gem simply because the weapon or ring it was sitting in has become obsolete.
One Important Warning
Do not salvage valuable gear before removing the Gems or Runes you want to keep.
If you’re cleaning out your inventory at the Blacksmith, take a second to check your socketed items first. Accidentally destroying a useful socketable is a completely avoidable mistake.
It’s the kind of mistake you make once.
After that, you start checking every Legendary twice.
When Should You Add Sockets?
This is arguably more important than knowing how to add them.
I’d strongly recommend avoiding expensive socketing on temporary equipment. If you’re still replacing weapons and jewelry every few hours, there is little reason to spend limited Scattered Prisms trying to perfect them.
A much better time to invest is when you’ve found a piece with strong affixes and long-term endgame potential.
Before spending your materials, ask yourself:
- Is this item actually part of my final build?
- Are the affixes worth investing in?
- Am I likely to replace it soon?
- Does my build genuinely benefit from another socket?
- Do I have enough Scattered Prisms left for more important upgrades?
That last question matters more than it seems.
A Practical Upgrade Order for Endgame Gear
There is a popular idea among experienced players that you should think carefully about the order in which you invest in a promising item.
Rather than immediately dumping every available resource into it, build the item in stages.
Socket → Enchant → Temper → Aspect → Masterwork
The reasoning is straightforward.
First, make sure the item can support the socket configuration your build needs. Then fix undesirable stats through enchanting. After that, work on tempering and your Legendary Aspect before committing heavily to Masterworking.
The exact order can vary depending on the item and your build, but the larger principle remains useful:
Don’t spend expensive endgame materials on an item before you’re sure the base item is worth keeping.
Masterworking a mediocre item doesn’t magically turn it into a perfect one.
Diablo 4 Best Gems Guide (2026 Update): Optimal Sockets for Weapons, Armor, and Jewelry
Common Socketing Mistakes
Even veteran players occasionally get careless when they’re moving quickly through endgame content.
The biggest mistakes are usually resource-management problems rather than mechanical ones.
Socketing temporary gear is probably the most common. If an upgrade is likely to replace your current item soon, save the Prism.
Ignoring socket caps is another. Check what the item can actually hold before planning your final setup.
Using the wrong gem for your build can also waste potential. More damage isn’t automatically better if you’re already hitting your offensive targets but dying because your defenses are behind.
And finally, forgetting to unsocket before salvaging is just painful.
Diablo 4 Crossplay Voice Chat Not Working: Xbox & PC Fix (2026)
Final Thoughts: Sockets Are Small, But They Matter
Diablo 4’s socket system isn’t complicated, but it becomes increasingly important as your character moves into serious endgame content.
The actual process takes seconds: visit the Jeweler, select your item, pay the gold and Scattered Prism cost, and you’re done. The real decision is whether that item deserves the investment in the first place.
For most players, the best approach is to save Scattered Prisms for gear that has genuine long-term value. Use World Bosses, Treasure Goblins, Legendary salvaging, and Tree of Whispers rewards to build your supply naturally, then spend it on equipment that fits your final build.
And remember the socket caps: one on most one-handed weapons and jewelry, two on two-handed and ranged weapons, and up to two on several armor pieces.
Once you stop treating sockets as something you add whenever the option appears and start treating them as part of your overall itemization strategy, the system makes a lot more sense.
In Diablo 4’s endgame, tiny optimizations add up. A single socket might not transform your character overnight, but the right socket on the right piece of gear is exactly the kind of small improvement that separates a finished build from one that’s still being assembled.