Control Resonant Best PC Settings: Maximize FPS for 144Hz Smooth Gameplay
I have a simple rule with demanding PC games: if the Ultra preset makes the game feel worse to play, it isn’t the right preset for me.
That matters even more with Control Resonant. Remedy’s latest take on the Northlight Engine can throw an absurd amount of visual information at your PC at once. Destruction, particles, supernatural effects, reflections, volumetric lighting and constantly changing environments can turn a perfectly respectable frame rate into a stuttery mess within seconds.
And honestly, that’s the first thing I noticed when looking at the game’s performance profile. The difference between a beautiful 90 FPS setup and a supposedly “better” 55 FPS Ultra configuration is huge once you’re actually moving through a fight.
If you’re using a 144Hz monitor, the goal should not necessarily be “make every setting Ultra.” The real goal is high and consistent frame delivery.
For me, a stable 120–144 FPS with sensible settings is much more enjoyable than watching the frame counter bounce between 70 and 130 FPS because every shadow, reflection and ray-traced effect is maxed out.
So here’s how I’d approach Control Resonant PC optimization in 2026.
Start With the Settings That Actually Cost FPS
Not every graphics option deserves equal attention. Some settings barely change performance, while others can hammer your GPU for relatively minor visual gains.
That’s why I wouldn’t randomly lower everything. Start with the biggest offenders.
| Setting | Recommended 144Hz Choice | Why |
|---|---|---|
| Texture Resolution | Medium / High | Depends heavily on VRAM |
| Texture Filtering | High | Very small FPS cost |
| Far Object Detail | Medium | Good balance between detail and CPU load |
| Shadow Resolution | Low | One of the easiest FPS wins |
| Shadow Filtering | Low | Further improves frame rate |
| Volumetric Lighting | Medium | Keeps the atmosphere intact |
| SSAO | Medium | Prevents the world from looking flat |
| SSR Quality | Medium | Good compromise for reflections |
| Global Reflections | Medium | Helps frame consistency |
| Foliage | Low | Useful in heavier environments |
| Ray Tracing | Off | Too expensive for a 144Hz target |
| Path Tracing | Off | Absolutely brutal on performance |
| Motion Blur | Off | Cleaner image during fast movement |
| Film Grain | Off | Cleaner overall presentation |
The important thing here is that you don’t have to make the game ugly.
Textures, filtering and environmental detail can stay relatively high. I would attack shadows, volumetrics, reflections and ray tracing first.
My Recommended 144Hz Control Resonant Setup
If I were sitting down with a fresh installation today, this is the configuration I’d start with.
Textures: Don’t Waste VRAM
Texture quality is one of those settings where people sometimes make the wrong sacrifice.
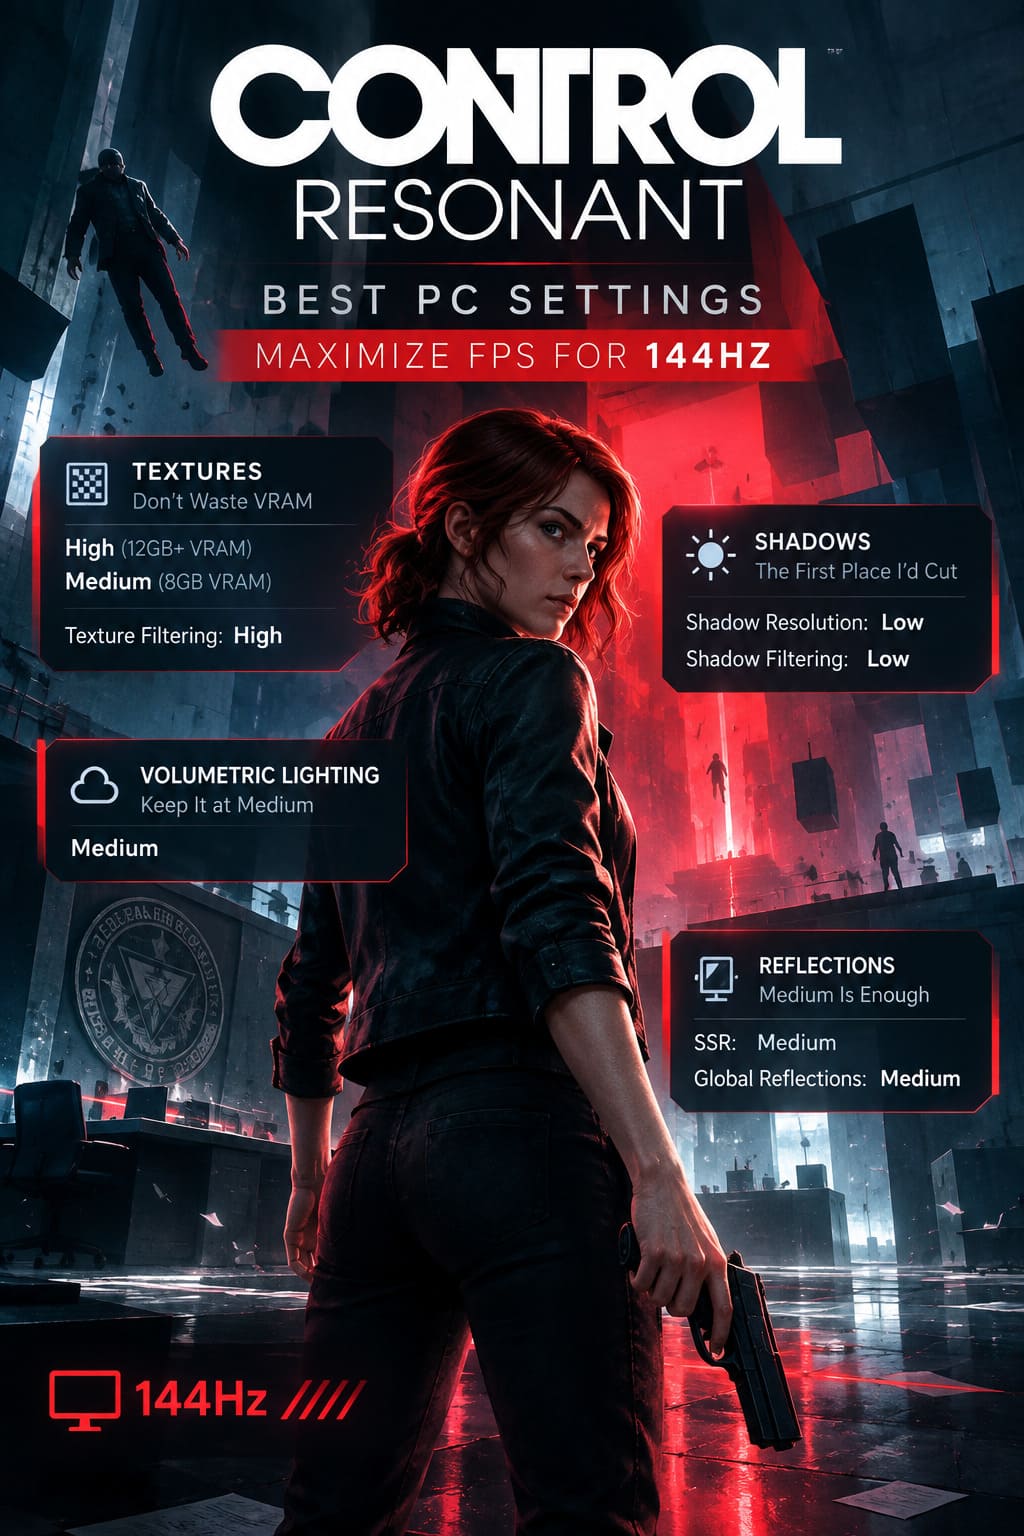
If you have 12GB or more of VRAM, I’d use High textures. If you’re running an 8GB card, Medium is the safer choice.
I wouldn’t immediately drop textures to Low just to gain a few frames. The visual hit can be much more obvious than the performance benefit.
Texture Filtering should stay on High. Anisotropic filtering generally has a tiny performance cost compared with the clarity it adds to floors, walls and distant surfaces.
Shadows: The First Place I’d Cut
If you’re chasing 144 FPS, shadows are one of the easiest places to start.
I’d use:
- Shadow Resolution: Low
- Shadow Filtering: Low
Yes, you will notice the difference if you stop and stare at a shadow. During an actual firefight, though? I’d rather have another chunk of frame rate and better responsiveness.
This is one of those compromises that makes sense specifically for a high-refresh setup.
Volumetric Lighting: Keep It at Medium
I wouldn’t turn volumetric lighting off immediately.
Remedy relies heavily on atmosphere, and a game like Control Resonant can lose some of its identity when you remove too much lighting depth. Medium is the setting I’d personally choose.
Low can provide another performance boost, but Medium gives the game room to breathe visually without demanding everything your GPU has.
Reflections: Medium Is Enough
Reflections are another sneaky performance drain.
With all the glossy surfaces, glass, polished floors and environmental details, Screen Space Reflections can become expensive during busy scenes.
My starting point would be:
- SSR: Medium
- Global Reflections: Medium
Going higher is possible, but I don’t think it’s where your performance budget should go when the goal is 144Hz.
Ray Tracing Is the First Thing I’d Sacrifice
This is probably the most controversial part of the setup, especially if you’ve bought an expensive RTX card specifically because you want to see what it can do.
I get it.
Ray tracing looks fantastic.
But if the goal is maximum FPS and competitive responsiveness, I would turn it off.
The same goes for path tracing.
Path tracing is an impressive technical showcase, but it makes very little sense in a configuration designed around maintaining extremely high frame rates.
My competitive preset is therefore simple:
Ray Tracing: OFF
Path Tracing: OFF
If you own something like an RTX 5090 and absolutely refuse to disable ray tracing, I’d experiment with Medium RT rather than maxing everything. But that’s a completely different goal from building a 144Hz performance profile.
DLSS and FSR Are Your Best Friends
This is where things get interesting.
At native resolution, Control Resonant can put serious pressure on even high-end hardware. Modern upscaling technologies exist for exactly this situation.
For NVIDIA users, I’d start with DLSS. AMD and compatible hardware can look toward FSR.
My general starting points would be:
| Display Resolution | Upscaling Recommendation |
|---|---|
| 1080p | DLSS/FSR Quality |
| 1440p | Quality or Balanced |
| 4K | Performance |
| 4K + 144Hz | Aggressive upscaling is basically mandatory |
At 1440p, Quality is where I’d begin. If you’re just short of your desired frame rate, move to Balanced.
At 4K, things get much harder. Trying to run native 4K while simultaneously demanding a locked 144 FPS is simply an enormous workload. That’s where Performance mode becomes much more reasonable.
The nice thing about modern reconstruction is that you don’t necessarily need native resolution to get a sharp-looking image.
Frame Generation: Useful, But Don’t Confuse It With Real FPS
Frame Generation can be extremely useful here.
If your game is already rendering somewhere around 70–90 FPS, enabling Frame Generation can push the displayed frame rate significantly higher and make a 144Hz display feel much more fluid.
But there’s an important distinction:
Generated frames are not the same thing as increasing your underlying rendering performance.
I wouldn’t use Frame Generation to hide terrible base performance. If your native frame rate is already struggling around 40 FPS, adding generated frames isn’t going to magically make the controls feel like a true 120+ FPS game.
My preference is to first establish a strong base frame rate, then use Frame Generation as the final step.
And if you’re using NVIDIA hardware, Reflex should be enabled where supported. AMD users should similarly look at Anti-Lag.
Windows Tweaks That Are Actually Worth Checking
Before blaming the game, I’d make sure Windows isn’t working against you.
Hardware-Accelerated GPU Scheduling
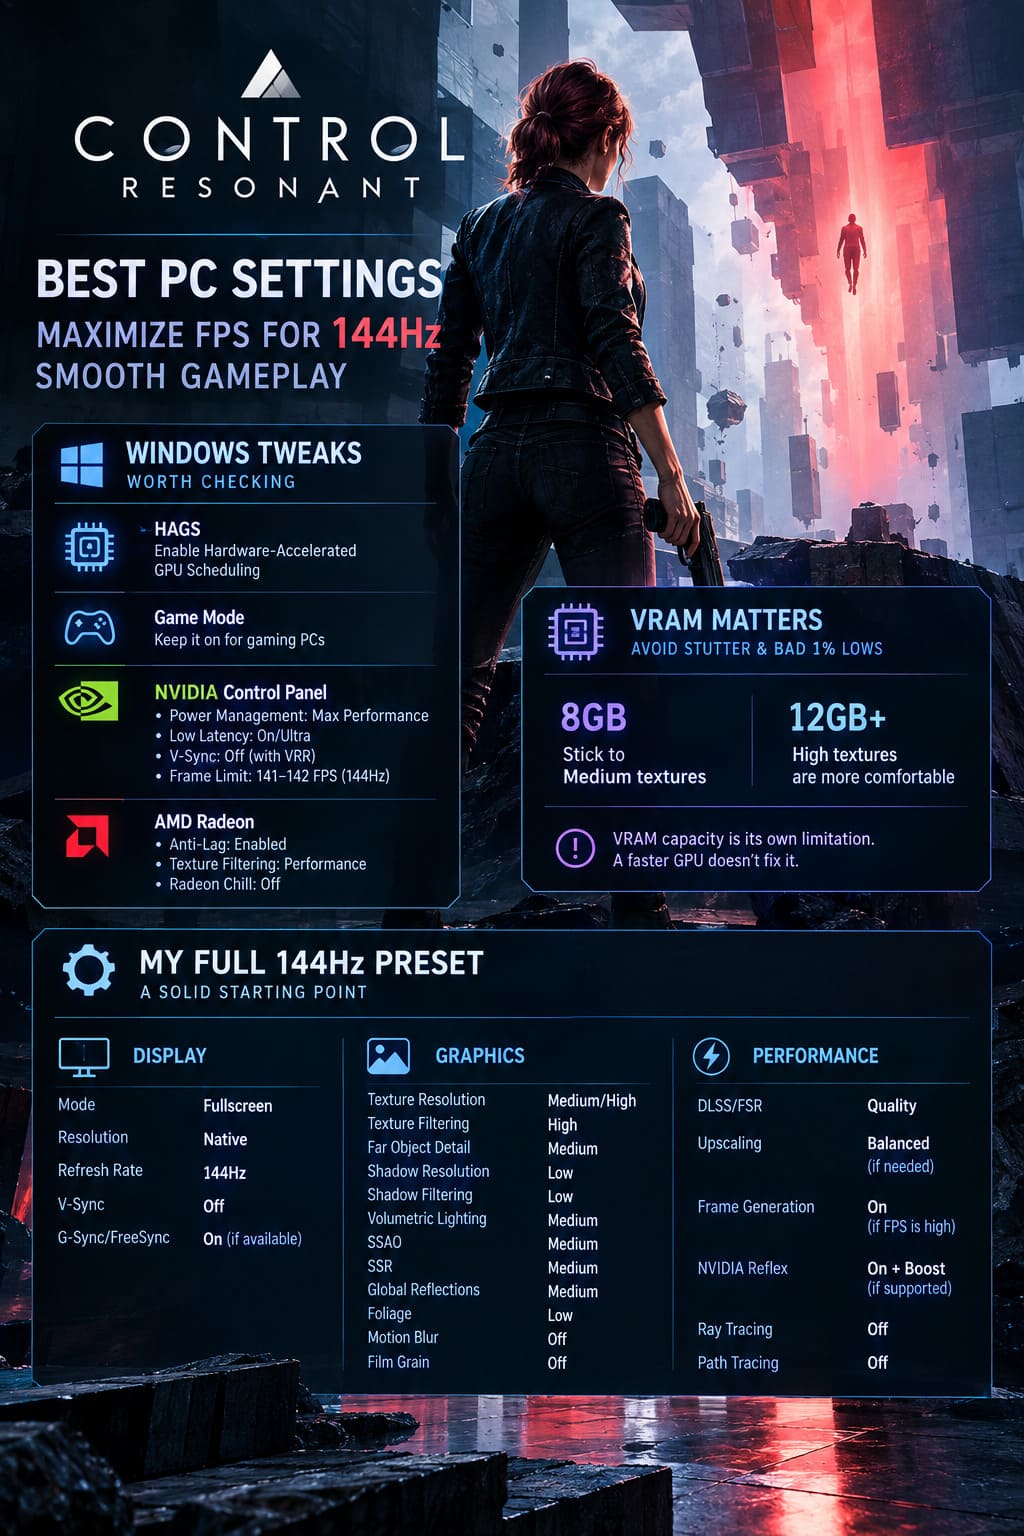
If your system supports HAGS, enable it and test your game afterward.
It’s particularly relevant when using modern GPU scheduling and frame-generation technologies.
Windows Game Mode
I keep Game Mode enabled on gaming PCs. It’s not some magical FPS button, but there’s little reason to let unnecessary background activity compete with a demanding game when you’re chasing high frame rates.
NVIDIA Control Panel
For an NVIDIA system, I’d check the game’s individual profile rather than changing global settings for everything.
A reasonable starting point:
- Power Management Mode: Prefer Maximum Performance
- Low Latency Mode: On/Ultra depending on your setup
- V-Sync: Off when using the appropriate VRR configuration
- Frame Rate Limit: Around 141–142 FPS for a 144Hz G-Sync setup
That last point is important.
If you’re using G-Sync or another VRR technology, capping slightly below the panel’s maximum refresh rate can help keep the game inside the adaptive-sync range instead of constantly slamming into the refresh ceiling.
AMD Users Have Similar Options
Radeon users aren’t left out.
I’d look at:
- AMD Anti-Lag: Enabled
- Texture Filtering Quality: Performance
- Radeon Chill: Off, unless you’re specifically using it for power or temperature management.
Again, don’t expect one driver option to suddenly give you 30 extra FPS. These are finishing touches, not replacements for sensible graphics settings.
Don’t Ignore VRAM
This is one of the easiest things to overlook when troubleshooting stutter.
Average FPS can look completely acceptable while 1% lows are terrible.
That’s often where VRAM pressure becomes relevant.
An 8GB graphics card can be perfectly capable of running the game, but you need to be more careful with texture and reflection settings. Once the game starts aggressively moving data between VRAM and system memory, frame pacing can deteriorate quickly.
If you have 8GB, I’d stick with Medium textures.
With 12GB or more, High becomes much more comfortable.
I would not assume that having a faster GPU automatically solves VRAM limitations. VRAM capacity is its own limitation.
My Full 144Hz Preset
If you don’t want to spend an hour testing individual settings, start here:
Display
- Fullscreen
- Native monitor resolution
- 144Hz refresh rate
- V-Sync Off
- G-Sync/FreeSync enabled where appropriate
Graphics
- Texture Resolution: Medium/High depending on VRAM
- Texture Filtering: High
- Far Object Detail: Medium
- Shadow Resolution: Low
- Shadow Filtering: Low
- Volumetric Lighting: Medium
- SSAO: Medium
- SSR: Medium
- Global Reflections: Medium
- Foliage: Low
- Motion Blur: Off
- Film Grain: Off
Performance
- DLSS/FSR: Quality initially
- Upscaling: Balanced if necessary
- Frame Generation: On when base FPS is sufficiently high
- NVIDIA Reflex: On + Boost where supported
- Ray Tracing: Off
- Path Tracing: Off
This is the profile I’d use before changing anything else.
Control Resonant Talent Points Guide: How to Farm Skill Points Fast
What If You’re Still Getting Stutters?
This is where average FPS numbers can become misleading.
If you’re seeing 140 FPS and still feeling occasional freezes, look at frame pacing, not just the headline FPS number.
Shader compilation can cause temporary hitches after a fresh installation or driver update. Give the game some time after first launching it rather than immediately assuming something is broken.
Storage can matter too.
For a modern game with aggressive asset streaming, I strongly recommend installing Control Resonant on an internal NVMe SSD rather than an old mechanical hard drive or slow external storage.
And while changing process priority to High is sometimes suggested online, I wouldn’t treat it as a universal miracle fix. If you’re troubleshooting stutter, I’d prioritize drivers, shader behavior, storage, VRAM usage and background applications first.
How to Fix Control Resonant Out of VRAM Error on NVIDIA RTX Cards (2026 Guide)
144Hz Isn’t About a Pretty Benchmark Screenshot
This is the part I think gets lost in a lot of PC optimization guides.
A screenshot showing every setting on Ultra looks impressive. A benchmark showing a massive average FPS number also looks great.
But when you’re actually playing, consistency matters more.
A stable 120–144 FPS image with good frame pacing can feel dramatically better than a beautiful but unstable 70–100 FPS experience.
That’s especially true during the chaotic encounters that make Control Resonant so demanding. When abilities, particles, destruction and enemies are all appearing simultaneously, I want the game to remain responsive rather than suddenly becoming a slideshow because I insisted on Ultra shadows.
For my money, the best Control Resonant PC settings are therefore not the ones that make the benchmark screenshot look the prettiest. They’re the settings that preserve Remedy’s incredible atmosphere while giving the GPU enough breathing room to maintain high frame rates.
Turn down the expensive stuff first. Keep textures and filtering respectable. Use DLSS or FSR intelligently. Keep ray tracing disabled if 144Hz is the priority, and treat Frame Generation as a finishing tool rather than a substitute for real rendering performance.
That’s the setup I’d start with—and then I’d only increase individual settings if the GPU still has enough headroom.
After all, there’s not much point admiring a gorgeous shadow for half a second if the game stutters when the next enemy walks through it.