Dead or Alive 6 Last Round Walkthrough Guide: Master the System, Complete Story Mode, and Dominate the Meta
I’ve spent countless hours across various fighting games over the years, but very few titles continue pulling me back the way Dead or Alive 6 does. While many players initially dismissed it as another flashy fighter, those who stayed discovered one of the deepest and most rewarding 3D combat systems available today.
What makes DOA6 special isn’t simply its speed or presentation. It’s the constant mind games. Every exchange feels like a gamble where knowledge, prediction, and confidence matter just as much as execution. Whether you’re jumping into Story Mode, grinding DOA Quest challenges, or stepping into online matches, understanding the game’s mechanics transforms the experience completely.
This guide covers everything I wish someone had explained when I first started playing.
Why Dead or Alive 6 Still Feels Different
Most fighting games revolve around spacing, frame traps, and resource management. Dead or Alive 6 certainly includes those elements, but its famous Triangle System creates an entirely different flow of combat.
Every decision carries risk.
Every defensive choice can be punished.
Every successful read feels incredibly satisfying.
Once you understand this core philosophy, the entire game starts making sense.
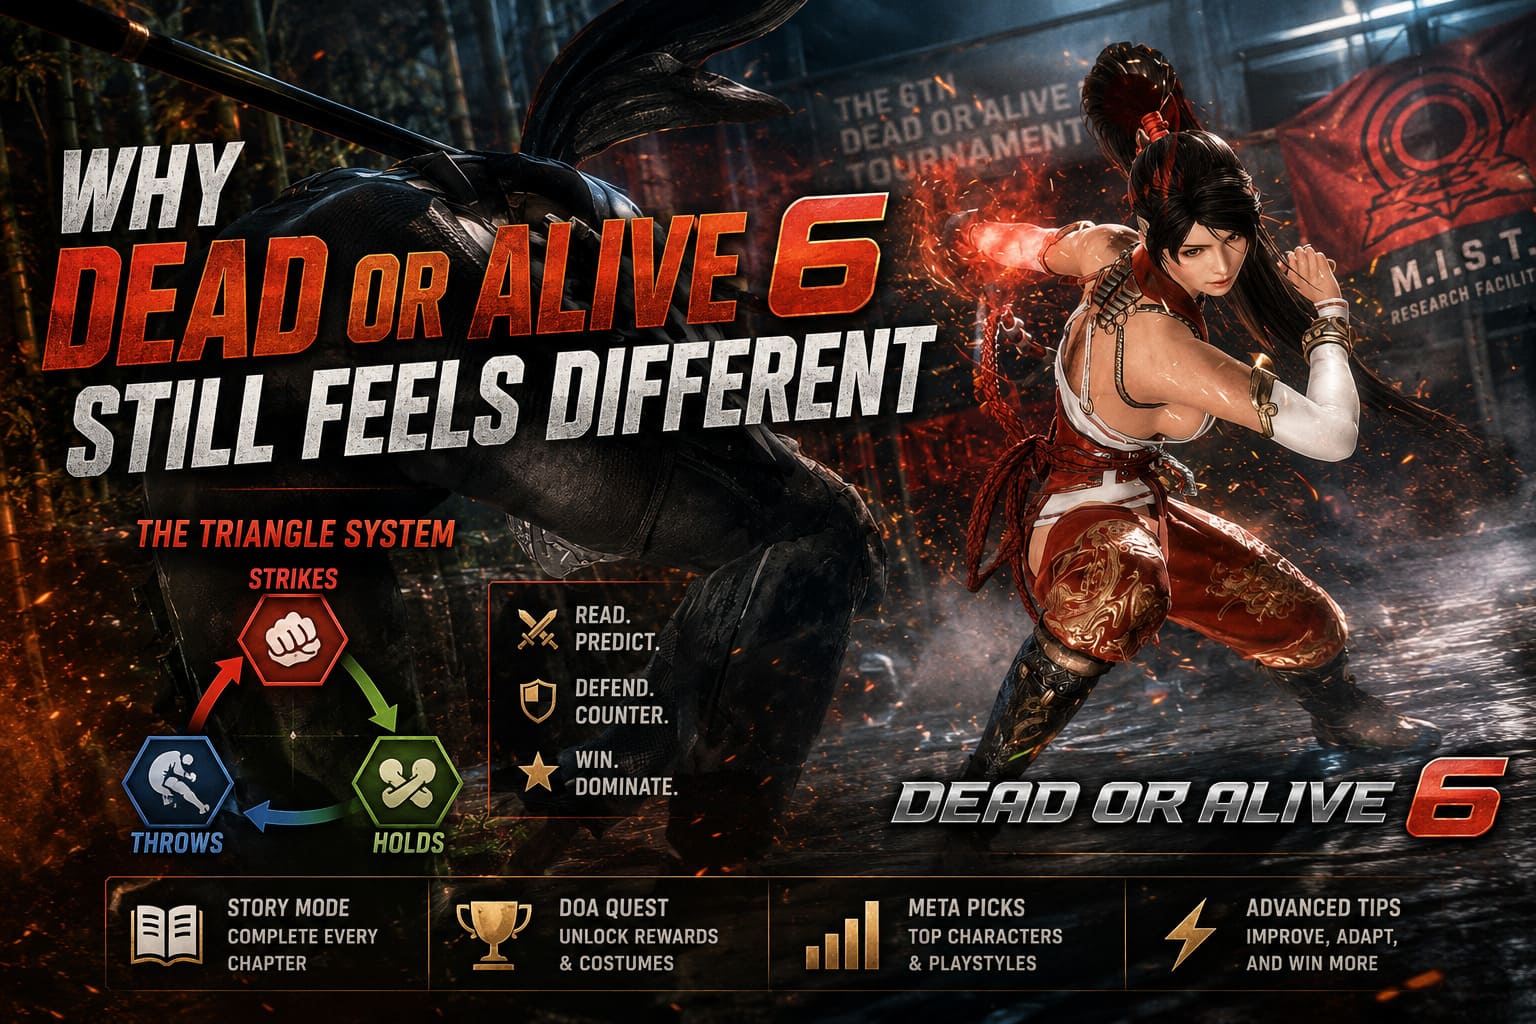
Understanding the Triangle System
The combat engine revolves around three major actions:
| Action | Defeats | Vulnerable To |
|---|---|---|
| Strikes | Throws | Holds |
| Throws | Holds | Strikes |
| Holds | Strikes | Throws |
At first glance it seems simple, but matches become incredibly layered once players begin mixing these options together.
Strikes Beat Throws
If your opponent attempts a throw while you’re attacking, your strike interrupts them immediately.
Fast attacks become extremely valuable because they can shut down aggressive grapplers before they even start their offense.
Throws Beat Holds
This is where many beginners struggle.
A lot of new players rely too heavily on holds whenever pressure starts. Experienced players recognize this habit instantly and punish with devastating throws.
Landing a Hi-Counter Throw against a failed hold can remove huge chunks of health in seconds.
Holds Beat Strikes
When used correctly, holds completely reverse momentum.
Predicting the exact attack type and countering it feels amazing, especially against opponents who rely on repetitive offensive strings.
The Four-Way Hold System Explained
Unlike many fighters that offer a universal parry, DOA6 requires precise defensive reads.
You must correctly identify the incoming attack height:
- High Attacks: Up-Back + Hold
- Mid Punches: Back + Hold
- Mid Kicks: Forward + Hold
- Low Attacks: Down-Back + Hold
One mistake I made early was trying to hold constantly.
The reality is that smart defense often means simply blocking and waiting. Failed holds create opportunities for opponents to punish you with massive damage.
Learning patience is just as important as learning execution.
Why the Break Gauge Changes Everything
The Break Gauge was one of the most significant additions to Dead or Alive 6.
Some veterans initially disliked it, but after spending hundreds of matches with the system, I genuinely think it adds another strategic layer.
The meter fills through:
- Attacking
- Blocking
- Taking damage
Once available, it grants access to two powerful tools.
Fatal Rush
This mechanic is beginner-friendly but surprisingly effective.
Repeatedly pressing the Special button unleashes a tracking combo that can convert into a cinematic Break Blow when your meter is full.
It’s simple, but it shouldn’t become your primary strategy against experienced opponents.
Break Hold
If there’s one mechanic every new player should learn immediately, it’s this one.
Break Hold consumes half your gauge and can defend against almost any strike regardless of height.
Whenever I find myself trapped in a dangerous stun situation, Break Hold is often my emergency escape button.
Used wisely, it can completely change the outcome of a match.
Story Mode Walkthrough
The Story Mode is structured like an interconnected timeline where multiple character narratives overlap.
Rather than following one protagonist from beginning to end, you’ll experience different perspectives that eventually converge into the main conflict.

Act One: M.I.S.T. Returns
The early chapters focus heavily on Kasumi and the ongoing threat posed by M.I.S.T.
These opening fights act as a practical tutorial while introducing key story elements involving cloning experiments and Phase-4.
Kasumi’s Chapters
Kasumi’s speed makes her perfect for beginners.
Her mobility allows aggressive pressure while remaining relatively safe compared to slower characters.
During these early encounters, focus on:
- Quick jab pressure
- Teleport mixups
- Basic combo execution
Fighting Phase-4
Phase-4 can overwhelm new players because of her sudden movement and unpredictable offense.
Many of her approaches naturally flow into mid-level attacks, making mid-punch holds particularly effective if your timing is solid.
Act Two: The Sixth Tournament
This section introduces numerous rivalries and character-specific storylines.
Several memorable fights occur here, including the clash between Diego and Jann Lee.
Diego vs Jann Lee
Both characters represent completely different philosophies.
Diego thrives on aggression and raw pressure.
Jann Lee rewards spacing, timing, and precision.
When using Diego, staying close is critical. Constant pressure forces mistakes and prevents Jann Lee from controlling the pace.
When playing Jann Lee, patience pays off. His kicks and counter opportunities can quickly punish reckless offense.
Rig’s Laboratory Battles
Some of the game’s most entertaining stages appear during Rig’s storyline.
The environmental hazards become major factors here.
Whenever possible:
- Push opponents into danger zones
- Use wall splats
- Trigger environmental damage
Many fights become dramatically easier once you start utilizing the stage itself as a weapon.
Act Three: The Final Showdown
The story eventually reaches its climax within the hidden facility where M.I.S.T. attempts to complete its plans.
This section features several of the game’s toughest AI encounters.
Helena’s Missions
Helena’s Bokuho stance is the key to success.
Many players ignore stance mechanics initially, but Helena demonstrates why they matter.
Her low-profile movement allows attacks to whiff entirely before she launches devastating counters.
Final Boss Battles
The AI becomes noticeably more reactive during the final chapters.
This is where many players make the mistake of relying on slow launchers and predictable strings.
My advice is simple:
- Use quick jabs
- Prioritize safe attacks
- Build meter steadily
- Save Break Gauge resources for emergencies
Slow and consistent often beats flashy and risky.
Conquering DOA Quest Mode
If your goal is unlocking costumes and collecting rewards, DOA Quest Mode should become your second home.
Each challenge contains unique objectives that encourage experimenting with various mechanics.
Fastest Ways to Complete Common Objectives
Land a 5-Hit Combo
Fatal Rush is usually the easiest solution.
The tracking makes execution extremely forgiving, allowing players to complete the challenge quickly.
Score Counter Hits
Wait for aggressive opponents to initiate attacks and interrupt them with fast pokes.
Even simple jabs frequently satisfy this requirement.
Trigger Danger Zones
Characters with strong knockback excel here.
- Bass
- Bayman
- Diego
Positioning matters more than damage.
Get opponents near hazards first, then launch them into environmental traps.
Successful Holds
Don’t guess randomly.
Observe patterns.
Many AI opponents repeatedly use similar attack strings, making their next move surprisingly predictable after a few rounds.
Character Archetypes and Meta Picks
One of the reasons DOA6 remains enjoyable is the variety of playstyles available.
Rushdown Specialists
Kasumi
Fast, aggressive, and beginner-friendly.
Ayane
Excellent mobility and confusing stance transitions.
Phase-4
Highly explosive offense with strong pressure options.
These characters reward constant movement and offensive momentum.
Grapplers
Bass
Massive damage potential and terrifying command throws.
Bayman
Exceptional punishment opportunities and advanced counter tools.
Tina
A balanced grappler capable of controlling both offense and defense.
These fighters thrive on conditioning opponents into making defensive mistakes.
Balanced Characters
Hitomi
Arguably one of the best characters for learning fundamentals.
Diego
Simple but effective pressure-focused gameplay.
Ryu Hayabusa
A powerful hybrid fighter with excellent mobility and devastating throw options.
If you’re unsure where to begin, Hitomi remains my personal recommendation.
Advanced Tips That Improved My Win Rate
After spending significant time against stronger opponents, several lessons stood out.
Learn Fuzzy Guard
Fuzzy Guard helps defend against multiple attack types while minimizing risk.
Mastering this technique dramatically improves survivability against aggressive players.
Understand Weight Classes
Not every combo works universally.
Lightweight characters stay airborne longer.
Heavyweights fall faster.
Adapting your combo routes based on character weight is essential for maximizing damage.
Abuse Critical Stun Opportunities
Critical Stun is one of the most dangerous situations in the game.
Your opponent cannot block, but they can still attempt holds.
The solution?
Mix your attack heights constantly.
Force them to guess wrong.
Buffer Your Inputs
Advanced players rarely perform commands after animations end.
Instead, they buffer inputs during recovery frames.
This creates smoother execution and significantly improves consistency.
Dead or Alive 6 Last Round Release Date & Review (2026): Is It Worth Buying on Next-Gen?
Final Thoughts
Even years after release, Dead or Alive 6 remains one of the most mechanically satisfying fighting games available. The combination of the Triangle System, environmental interactions, character diversity, and fast-paced combat creates an experience that rewards both strategy and skill.
What keeps me returning isn’t the visuals or even the roster—it’s the feeling that every match teaches something new. One round you’re dominating through pressure, and the next you’re getting completely dismantled by a smarter defensive read.
Master the Triangle System. Learn when not to press buttons. Respect the power of Holds and Throws. Most importantly, stay patient and keep experimenting with different characters.
The deeper you dive into Dead or Alive 6, the more you’ll realize just how much depth Team Ninja packed into this underrated fighting masterpiece.