Witcher 3 Remastered: White Orchard 100% Map Guide – All Points of Interest, Places of Power, and Monster Nests
White Orchard is easy to underestimate.
At first glance, it looks like little more than a tutorial area where Geralt learns how to swing a sword, cast Signs, use bombs, and follow Witcher Senses. But if you rush through the opening quests and ride straight toward Velen, you are leaving behind some of the most useful early-game rewards in The Witcher 3: Wild Hunt Remastered.
I have always liked White Orchard precisely because it rewards players who slow down. It is small enough to explore without becoming exhausting, yet it already contains the basic version of almost everything that makes the larger game work: monster contracts, hidden loot, abandoned settlements, bandit camps, treasure hunts, crafting materials, and Places of Power.
For a completionist run, this is basically Geralt’s first real test.
The biggest reason to clear the region is the six Places of Power. Each one gives a permanent Ability Point the first time you draw from it, while also providing a temporary boost to a specific Sign. That is a huge amount of character progression this early in the campaign.
So, if your goal is a 100% White Orchard map, here is how I would approach it.

Why White Orchard Is Worth Clearing Completely
White Orchard is technically the prologue, but its rewards can carry into the opening hours of the main campaign.
Clearing the area can provide:
- Six additional Ability Points from Places of Power.
- Monster parts and crafting materials from Monster Nests.
- Early weapon and armor diagrams.
- Alchemy ingredients.
- Experience for reaching the next level threshold more comfortably.
- Treasure Hunt clues and hidden loot.
- Additional merchants and useful services after clearing Abandoned Sites.
The important thing is that you do not need to treat every question mark as an isolated activity. Several locations are positioned close together, so a little route planning saves a surprising amount of backtracking.
White Orchard 100% Overview
| Activity | Main Reward |
|---|---|
| Places of Power | Ability Points + Sign Buffs |
| Monster Nests | XP + Monster Parts + Crafting Materials |
| Bandit Camps | Weapons + Diagrams + Treasure |
| Guarded Treasures | Rare Loot + Crafting Components |
| Hidden Treasures | Coins + Equipment + Quest Rewards |
| Abandoned Sites | XP + Returning Merchants |
The Six Places of Power Should Be Your Priority
If there is one thing I would tell a new player not to skip, it is the Places of Power.
The temporary Sign bonus is nice, but the permanent Ability Point is the real prize. Six points this early can completely change the opening build, especially if you are playing on a higher difficulty.

1. Aard Place of Power
The Aard stone is hidden in the northern woodland between the Mill and Cackler Bridge.
The surrounding area can be dangerous for a fresh Geralt, particularly if you encounter a stronger Ghoul. I would not blindly charge in. Use Quen for safety, keep moving, and avoid letting multiple enemies surround you.
Once the area is clear, draw from the stone and take your first extra Ability Point.
2. Igni Place of Power
This one sits near the small graveyard north of the Mill.
The real problem here is the Wraith guarding the area. If you have never fought one before, it can feel surprisingly annoying because of its movement and ethereal state.
Yrden is the answer.
Drop the Sign beneath the Wraith and fight inside the magical circle whenever possible. Once the enemy is dealt with, the Place of Power is yours.
There is also a nice bit of extra exploration here because the nearby crypt connects with hidden loot and the Viper Silver Sword treasure.
3. Yrden Place of Power
Head into the southern woodland near the Abandoned Village.
A Bear can be found around the monument, and this is one of those fights where patience matters more than aggression. Bears hit hard, but their attacks are much easier to read than those of faster enemies.
Dodge sideways, circle behind it, and punish the recovery animation.
After the fight, grab the Yrden Ability Point.
4. Quen Place of Power
The Quen monument sits on a ridge overlooking the battlefield.
This is one of the easier Places of Power to collect because the surrounding enemies are relatively manageable. The real advantage is the Sign itself.
Early in the game, Quen is incredibly forgiving. It gives you room to make mistakes, and that matters when Geralt’s armor and health pool are still mediocre.
5. Axii Place of Power
You will find the Axii monument northwest of the Crossroads.
Wolves may be wandering nearby, but there is usually nothing particularly complicated about this location.
Clear the immediate threat, interact with the stone, and take another free Ability Point.
6. Second Quen Place of Power
The final stone is in the western part of White Orchard near the rocky terrain southwest of the Nilfgaardian Garrison.
Watch your footing here. The cliffs are more dangerous than the enemies.
Collecting this final stone gives you the sixth Ability Point, which is one of the best reasons to fully explore White Orchard before leaving.
Monster Nests: Don’t Just Destroy Them and Leave
White Orchard has three Monster Nests, and they are worth clearing even if you are primarily interested in progression.
The nests are associated with Ghoul encounters, so having Necrophage Oil ready can make these fights considerably easier. Once the monsters are dead, use a suitable bomb such as Grapeshot or Samum to destroy the nest.
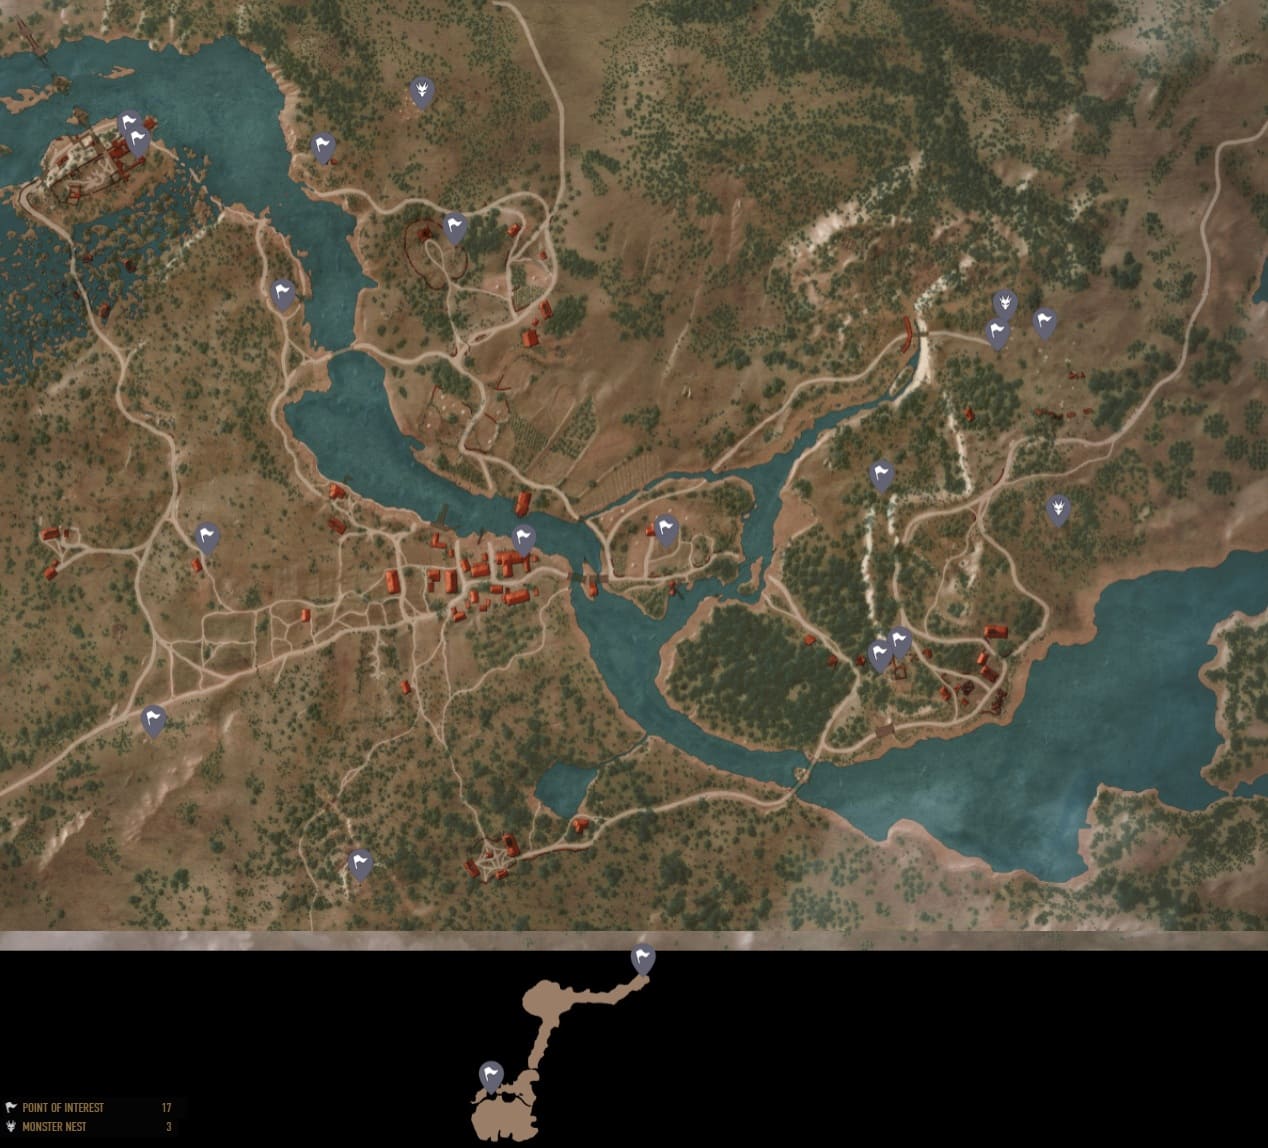
The three locations are:
- Northeast of Cackler Bridge – hidden among the northern woods.
- East of the Crossroads – positioned in the open battlefield.
- South of the Nilfgaardian Garrison – located around the wetland area.
The battlefield nest is especially easy to underestimate because there is little terrain protecting you. Ghouls can surround Geralt quickly, so Quen and controlled dodging are safer than standing still and trading blows.
And remember: loot the destroyed nest. It is very easy to get distracted by the next question mark and forget that the nest itself can contain useful materials.
Bandit Camps Hide Some of the Best Early Loot
Bandit Camps are another reason I would not leave White Orchard too quickly.
The most interesting locations include the camp southeast of the Sawmill, the ruined structure north of Ransacked Village, and the smaller camp hidden toward the eastern forest.
The camp near Ransacked Village deserves particular attention because of the Viper School Steel Sword diagram associated with the area.
Shield-bearing enemies can be irritating when Geralt is under-equipped. Signs can help disrupt their defenses, while archers should generally be dealt with before they get too comfortable shooting from the back line.
Once the camp is cleared, search everything.
That sounds obvious, but Witcher 3 is full of moments where a player clears an encounter, grabs the obvious chest, and rides away without checking the rest of the location.
Guarded Treasures and the Graveyard Crypt
Guarded Treasures are basically White Orchard’s way of telling you: there is good loot here, but you are going to earn it.
One is located along the swampy route between the village and the Nilfgaardian Garrison. Another can be found around the northern riverbanks.
The more memorable one, however, is connected to the graveyard crypt.
After dealing with the Wraith around the Igni Place of Power, explore the crypt rather than immediately leaving. Use Aard where necessary to open the way through the structure.
Down below, you can find valuable loot alongside the Viper School Silver Sword diagram.
For me, this is exactly the kind of exploration The Witcher 3 does well. The reward is not simply sitting beside a giant glowing marker. You have to notice the environment, investigate the building, and connect one encounter with another.
Hidden Treasures Are Easy to Miss
The hidden treasure locations are not always obvious because their real starting point can be a corpse, note, key, or letter rather than a traditional treasure chest.
Temerian Valuables
Look around the bridge west of the Mill. A corpse can provide the clue or key needed to continue the search.
From there, investigate the nearby water and surrounding structures for the hidden stash.
Deserter Gold
This treasure is associated with the northeastern area around the Mill.
Search the small bandit location and look for the clue that points toward a concealed underground stash.
Dirty Funds
Another hidden treasure can be uncovered through information obtained from a bandit camp in the northern woods.
This is why I recommend looting enemy camps completely. A random letter can be more important than the weapon sitting in the nearest chest.
Abandoned Sites Are More Than Free XP
Abandoned Sites are some of the most satisfying locations to clear because the world actually changes afterward.
Once the monsters or hostile forces are removed, civilians can return. That can mean new merchants, herbalists, or other useful services becoming available.
Two locations worth checking are:
- West of Woesong Bridge, where Ghouls have taken over a roadside shrine.
- Southeast of Ransacked Village, where Drowners have driven people away from a lakeside settlement.
This is one of those small details that makes exploration feel meaningful. You are not just farming icons for completion percentage. You are effectively making the region safer.
Smuggler’s Cache and Spoils of War
The water around White Orchard deserves more attention than it usually gets.
Under Woesong Bridge, you can find floating Smuggler’s Cache containers containing useful early-game supplies, including crafting materials, alcohol, and coins.
There is also a larger underwater opportunity in the northwestern river area near the Nilfgaardian Garrison.
Bring your crossbow.
Drowners can make underwater exploration uncomfortable, but the reward for searching the submerged wreckage can include valuable ingredients and higher-tier loot.
Just keep an eye on Geralt’s breath meter. There is no glamorous way to drown while looting a chest, and I have absolutely made that mistake.
My Recommended White Orchard 100% Route
You do not have to follow the question marks in whatever order the game happens to reveal them.
A more efficient approach is to think in clusters.
Start at Woesong Bridge, collect the available notices, and reveal the surrounding Points of Interest. From there, work outward rather than constantly riding back through the same roads.
My preferred general order would be:
- Explore the southern and central locations around the village.
- Clear nearby Abandoned Sites and Bandit Camps.
- Investigate the graveyard and crypt.
- Collect the Viper sword-related treasure.
- Sweep toward the northern woods and river.
- Clear the three Monster Nests.
- Finish the remaining Places of Power.
- Check the rivers and underwater caches before leaving.
This route also gives you a natural opportunity to collect crafting materials and experience between the more dangerous encounters.
The Witcher 3 Remastered White Orchard Complete Map Guide: All Places of Power & Guarded Treasures
The Witcher 3 Remastered White Orchard Complete Map Guide: All Places of Power & Guarded Treasures
White Orchard 100% Checklist
Before riding toward Velen, I would make sure the following list is complete:
| Checklist | Status |
|---|---|
| 6 Places of Power | ☐ |
| 3 Monster Nests | ☐ |
| Bandit Camps | ☐ |
| Guarded Treasures | ☐ |
| Hidden Treasures | ☐ |
| Abandoned Sites | ☐ |
| Smuggler’s Cache | ☐ |
| River Spoils of War | ☐ |
| Viper Sword Treasure | ☐ |
| All Question Marks | ☐ |
Final Thoughts
White Orchard may be the smallest major area in the opening hours, but it teaches you an important lesson about The Witcher 3: the map markers are rarely the whole story.
A question mark might lead to a monster nest, a treasure hunt, a merchant, a buried clue, or a surprisingly useful diagram. Sometimes the best reward is not even the item itself, but the Ability Point, experience, crafting material, or new service you gain along the way.
The six Places of Power are the biggest reason to complete the region, but I would still recommend doing the entire sweep if you are starting a serious playthrough of the Remastered edition. You will leave White Orchard with a stronger build, more equipment options, more crafting resources, and a much better understanding of how exploration works.
And honestly, there is something satisfying about leaving the prologue knowing you did not simply rush through it.
Clear the map. Loot the nests. Search the crypt. Take the six Ability Points. Then ride into Velen.
That feels like the proper way to begin Geralt’s journey.